

For years I thought restaurant-style crepes were something you either had a knack for or you didn't. I'd tried them in a regular skillet a handful of times over the years, and every attempt came out too thick in the middle, torn at the edges, or stuck fast no matter how much butter I used. I figured the folks at the little breakfast place downtown just had a technique I was never going to pick up at home.
What actually changed things wasn't a technique at all. It was swapping the regular pan for the Moss & Stone electric crepe maker, an 8 inch griddle with a dipping plate that takes the hardest part of the whole process, spreading an even, paper-thin layer of batter, out of your hands entirely. These days I make crepes most Sunday mornings for Carol and whichever grandkids stayed over Saturday night, and they come out thin, even, and golden pretty much every time. Here's the exact process, start to finish, including the parts that took me a couple of tries to get right.
Skip the guesswork of a regular skillet
The Moss & Stone electric crepe maker uses a dipping-plate design that takes the hardest part of crepe-making off your hands. Check today's price before your next Sunday brunch.
Amazon Check Today's Price on Amazon →Step 1: Mix a Truly Thin Batter and Let It Rest
Restaurant crepes are thin because the batter is thin, and the Moss & Stone plate makes that thinness easy to hit, thinner than most home cooks expect the first time they make it. Carol mixes ours with flour, eggs, milk, a splash of melted butter, and a pinch of salt, whisked until it's smooth and pours almost like heavy cream off the whisk. If a spoonful sits on top of the batter for more than a second before sinking back in, it's too thick, and I'd rather thin it with a little extra milk than fight a batter that's too heavy the whole morning.
The other piece that matters more than people expect is resting the batter. Carol mixes ours the night before and lets it sit covered in the fridge overnight, though even an hour on the counter makes a noticeable difference. Resting lets the flour fully hydrate and the bubbles from whisking settle out, which is a big part of why restaurant crepes come out smoother than a batch you mix and cook five minutes later.
Give the batter a quick stir before you start cooking, since it separates a little sitting in the fridge overnight. If it's thickened up too much after resting, thin it with a tablespoon or two of milk until it's back to that pourable, heavy-cream consistency. This step alone fixed more of my early crepe problems than anything I changed about the actual cooking.
I'd also suggest cooking one throwaway crepe before you commit to a full batch, especially the first time you're working with a new bowl or a batter you haven't made in a while. It costs you thirty seconds and a spoonful of batter, but it tells you right away whether you need to thin things out further, and it saves you from tearing through three or four real attempts before you get a feel for where the batter needs to be that morning.
Step 2: Learn the Dip, Not the Spread
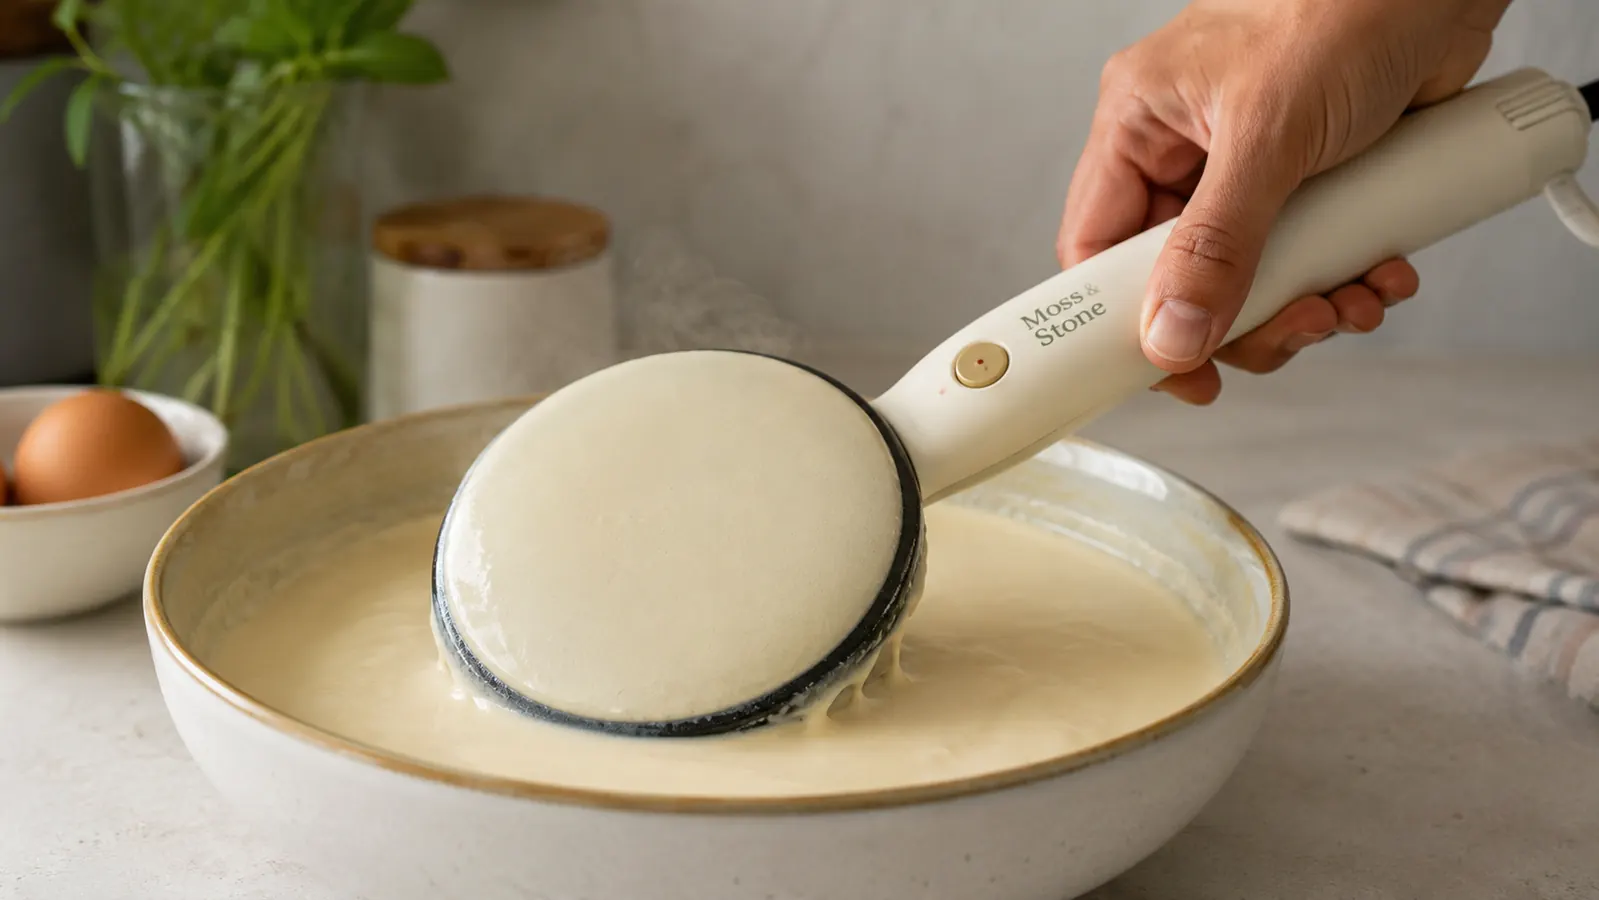
A traditional crepe pan asks you to pour batter into a hot pan and swirl it thin by tilting the pan around, which is exactly the step that trips up most home cooks, myself included for years. An electric dipping-plate crepe maker flips that around. You dip the hot, round plate face-down into a shallow bowl of batter, then flip it back over onto its base and let it cook. The batter that clings to the plate becomes your crepe, and the thickness is decided by how you dip, not by how steady your wrist is with a swirling pan.
The trick I had to learn with the Moss & Stone maker, and it only took a couple of Sundays, is to dip straight down and lift straight back up without tilting or swirling the plate at all. Tilting the plate on the way in or out is what leaves you with a thick spot on one side and a thin, torn spot on the other. Once I stopped trying to help the batter along with any extra motion, my crepes went from uneven to consistently thin within a single morning.
Bowl choice matters more than the instructions let on. You need something wide enough and deep enough to fully submerge the plate in one motion, and a narrow cereal bowl just won't do it. I switched to a wide, shallow pie dish for our batter, and the dip got noticeably cleaner once the plate could go all the way in and come straight back out without scraping the sides.
Let the Moss & Stone plate come up to full heat before your very first dip of the morning, usually a few minutes after switching it on. Dipping into a plate that isn't fully hot yet is a common reason the first one or two crepes of the batch turn out patchy or pale, even when the batter itself is fine. I've learned to use that warm-up window to get bowls and fillings staged so nothing else is slowing me down once the plate is ready.
Step 3: Cook It Fast and Don't Walk Away
A crepe this thin cooks fast, usually somewhere around 45 seconds on the hot Moss & Stone dipping plate, and that speed is exactly what gives you the light, slightly lacy edges you get at a restaurant. Watch for the edges to start curling up and losing their shine, and for the surface to go from wet-looking to matte. That's your signal it's ready to come off, not a timer, since stove and plate temperatures vary a little from one kitchen to the next.
Because it cooks so quickly, this is not a step where you want to be doing something else. I learned that the hard way early on, stepping away to grab more plates for the table and coming back to a crepe with one edge browned too far. Auto shut-off features on these griddles are a nice safety net for a forgotten machine, but they won't save an actual crepe that's been sitting too long.
A thin, flexible spatula makes lifting the finished crepe a lot easier than trying to peel it off with your fingers, especially while the plate is still hot. I run the edge of the spatula gently under one side first to loosen it, then slide the rest of the way across in one motion instead of picking at multiple spots, which is what tends to tear a crepe that's slightly underdone.
Once you've got the timing down, the rhythm becomes almost automatic. Dip, flip the plate onto its base, wait for the edges to curl and the shine to fade, lift the crepe off once it's cool enough, and dip again. On a good Sunday I can turn out a crepe every minute or so once everyone's plates are lined up and the assembly line is moving.

Step 4: Fill and Roll Like a Restaurant Plate
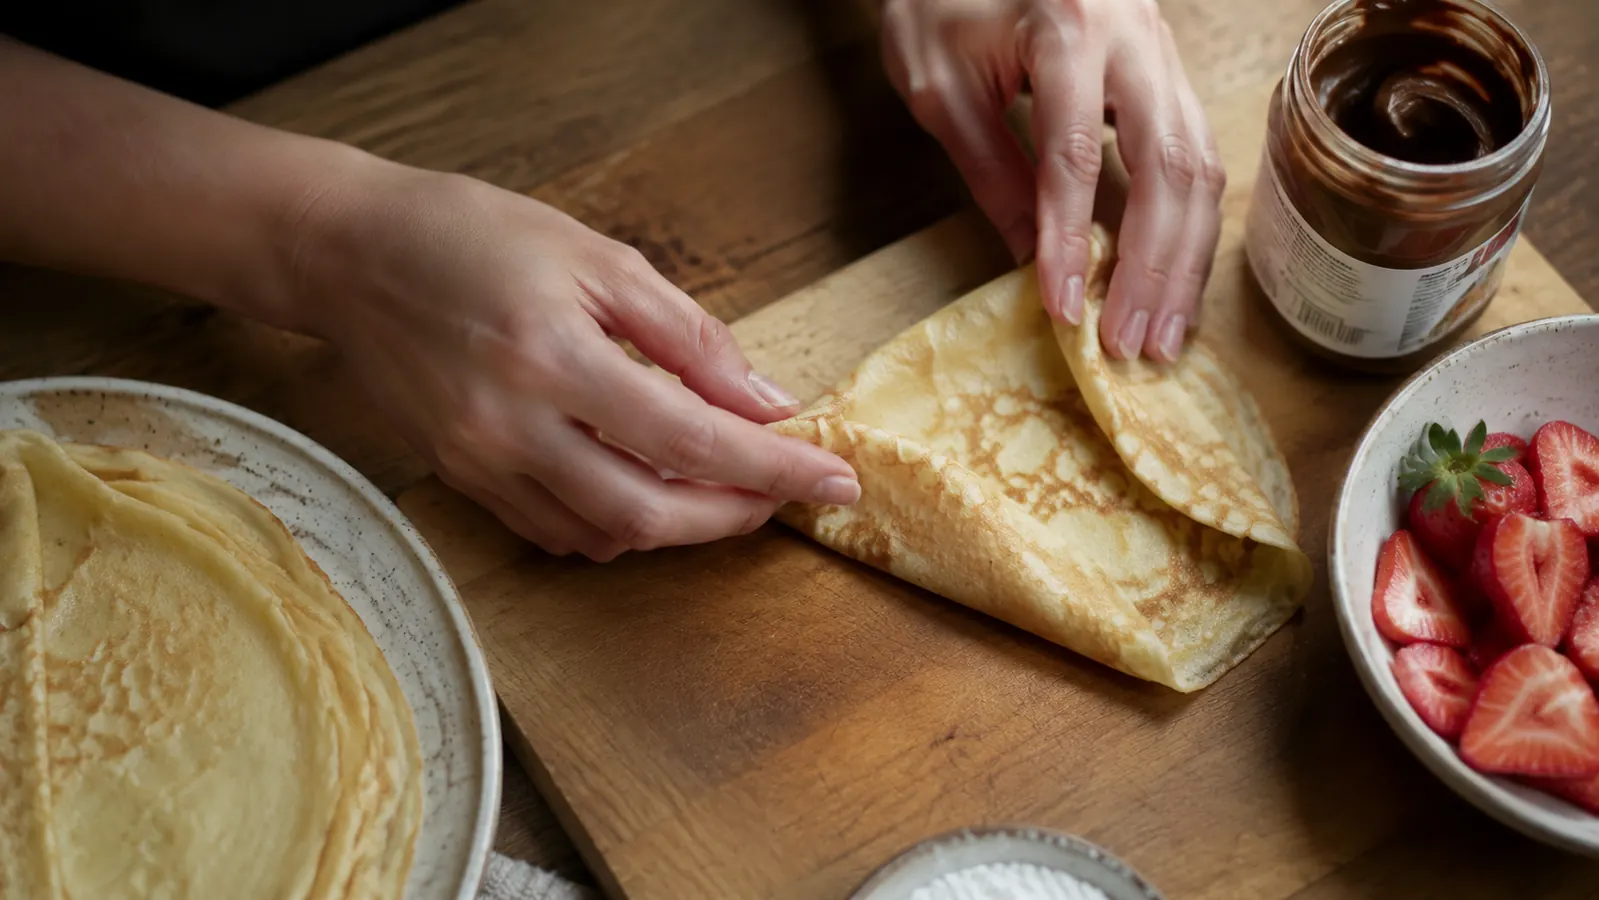
This is where a lot of home crepes fall short even after the cooking goes right. Restaurants don't overload a crepe with filling, and neither should you. A couple of spoonfuls of whatever you're using, whether that's Nutella, sliced strawberries, or a savory filling like ham and cheese, spread thin across half the crepe leaves you room to fold without everything squeezing out the sides the moment someone picks it up.
Fold it in half, then in half again into a quarter-circle wedge, which is the simplest fold and the one you'll see most often on a brunch menu. For something a little more polished-looking, roll the crepe around the filling like a thin cigar and set it seam-side down on the plate. Either way works, and I usually let the grandkids pick their own fold once they're old enough to build their own plate.
If you want to go the savory route, a warm filling helps more than a cold one. Sauteed spinach and cheese, or diced ham warmed through in a small skillet, folds into a crepe cleaner than something straight from the fridge, and it keeps the whole plate at a consistent temperature instead of a hot crepe wrapped around a cold center.
A light dusting of powdered sugar, a few extra berries on the side, or a drizzle of syrup right before serving is what pushes a crepe from homemade to restaurant-looking on the plate. It takes ten extra seconds and it's the difference between a crepe that looks like a Tuesday breakfast and one that looks like it came out of a real kitchen.
Step 5: Serve in Small Batches, Not All at Once
A restaurant serves crepes hot off the griddle, one plate at a time, and that's a habit worth copying at home even though it feels a little backwards when you're used to plating a whole meal at once. Crepes lose their light texture fast once they cool, and a stack of six sitting on the counter while you finish the rest turns rubbery by the time everyone sits down.
In our house that means I make two or three, hand them straight to whoever's waiting at the counter, and keep going. It's a little more work than plating everything at once, but it's the single biggest reason our crepes taste like they came from somewhere other than our own kitchen. If you do need to hold a few, a warm oven on its lowest setting with the crepes covered loosely will keep them from going cold and stiff.
Setting up a small topping bar off to the side, rather than plating each crepe fully yourself, actually speeds this whole step up. Once the grandkids know where the strawberries, whipped cream, and syrup live, they build their own plates the moment a crepe lands in front of them, which frees me up to keep the next one moving through the dip-and-cook rhythm instead of stopping to plate every single one.
What Else Helps
A few small habits made a bigger difference than I expected going in. Warming the fillings slightly, especially fruit straight out of the fridge, keeps the crepe from cooling the second it touches the plate. Setting out toppings in small bowls instead of their original containers turns breakfast into something the grandkids build themselves, which keeps them at the table longer than if I just handed them a finished plate.
I also keep the wooden spreader tool that came with our crepe maker off to the side entirely once I'm using the dipping method, since it's really built for a different style of crepe maker and doesn't do much for us here. If your first few crepes tear when you try to lift them, give them another five to ten seconds on the plate before attempting it, since underdone crepes are almost always the culprit, not a bad batter.
Leftover batter keeps fine covered in the fridge for a day or two, so I've stopped trying to guess the exact amount we'll go through on any given Sunday. It's easier to make a touch extra and store what's left than to run short with grandkids still waiting on seconds, and a rested extra day of batter has never made a noticeable difference in how the crepes turn out.
The batter was never the hard part. Learning to dip straight down and walk away from a plate that only needs 45 seconds, that's what actually got me to restaurant-thin crepes.
None of this is complicated once you've done it a couple of times, and most of it comes down to a thin, rested batter and trusting the dip instead of trying to help it along. These days a Sunday crepe morning takes me less time than it used to take to burn through three failed attempts in a regular skillet, and the grandkids notice the difference even if they couldn't tell you why.
Ready to get restaurant-style crepes on your own table
The Moss & Stone crepe maker's dipping-plate design is what finally got our crepes thin and even, no swirling pan required. Check today's price on Amazon and get your next brunch on the calendar.
Amazon Check Today's Price on Amazon →